HookMe, a tool for intercepting communications with API hooking

Florence Broderick    5 November, 2013
HookMe is a tool for Windows that allows to intercept system processes when calling APIs needed for network connections. The tool, still in beta, was developed by Manuel Fernández (now in Eleven Paths team) and Francisco Oca (one of the first developers of the earlier versions of FOCA). The tool was presented in BlackHat Europe & USA 2013.

When malware is analyzed, it is usual to study network traffic to better understand how it communicates with some external server, what information it downloads, and what commands it receives or sends. Usually, this kind of malware uses http or https to communicate, and the tools to actually get to “see” that traffic are well known (acting as a man in the middle). However, more sophisticated malware may use its own protocol encapsulated under SSL, even checking the server’s certificate (if it doesn’t get to communicate with a server that holds a specific certificate that is embedded in its code, it refuses to establish connection). Analyzing in a more comfortable way this kind of malware was the motivation to create this tool, but it may be useful for some scenarios, for instance:

  • Analyzing and modifying network protocols.
  • Application firewall (thanks to “on the fly” filters that it supports).
  • A tool for post-explotation and creating backdoors (injecting malware over the network protocol in a certain application).

API Hooking

Roughly, the hooking technique consists in intercepting communications between different processes, may it be function calls, events or messages. In the case of HookME, the hook is done between the calls that a certain process makes to data reception and data sending APIs.

When hooking any call, different techniques may be used. The most used are “AIT Hooking” and “InLine Hooking”. The latest is the one used by HookMe. It consists in modifying the code of the function that is going to be hooked, and jump to another portion of code before executing the original one. This modification consists in an unconditional jump (JMP) that points to some other memory address where actions by the hook itself are implemented.


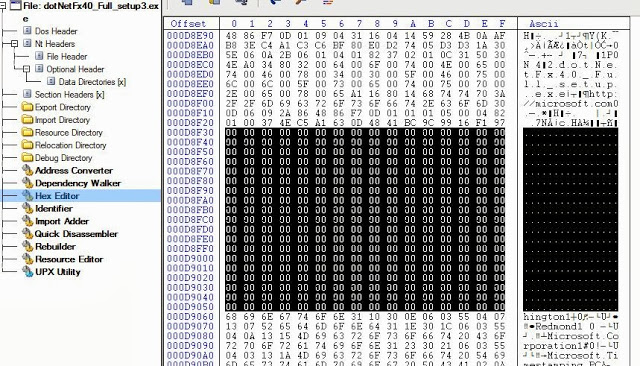
The following figures show the before and after look of hooking a call to the “send” API in WS2_32.dll.

“Send” function code before and after adding the hook

As observed, the memory address where the function “send” starts is 0x71A34C27 and implements a MOV EDI,EDI command. This instruction is replaced by an unconditional jump (JMP) to 0x0576000 address. This address will implement hook instructions code. The program, to solve potential errors because of functions changing addresses in different operative systems or versions, uses the well known Nektra Deviare2 DLL.


Windows sending and recieving APIs

HookMe’s goal is to intercept network sending and receiving API calls. The ones used for this in Windows are:

The first six ones are responsible for sending and receiving data over the network, in different ways. The two others (EncryptMessage and DecryptMessage) have a different goal. They are used by applications to cipher and decipher data in an easy way, supporting different cryptographic algorithms. These two APIs are hooked to get access to clear text data directly even if they are going to be sent over a secure channel (like SSL). Hookme, when intercepting these calls, allows the user to see and modify the input and output of these functions, even clear text data of SSL connections using Windows CryptoAPI. This is possible because data is intercepted just before it is ciphered and just after they are decrypted.

In the following figure, the interface shows clear text requests that is about to be sent by HTTPS. The shown content is the one going to be ciphered.


The interface

To get to hook the functions, HookMe implements a graphical interface that allows to be attached to a process (intercept and take over it). Before that, it is recommended to select the right API that is going to be intercepted. This is done with the menu in “Configuration, Hooks”.


Once a call is “hooked”, from the user interface it’s possible to intercept calls, or “let them go” with  Intercepting is ON / Intercepting is OFF button. If intercepted, the program will show its content in hexadecimal and text (ANSI).


From this window, the content may be modified before it is sent to the API or before data is returned back to the application (when the API returns something). In the screenshot above, the communication of HeidiSQL (a Windows graphical client for MySQL) is being intercepted. The screenshot shows the exact authentication packet between client and server. In 0x24 offset ‘root’ user is shown, and in 0x29 the hash of the password that has been introduced.

HookME can apply on the fly replace rules, without the user interacting. In the tab Match and replace, rules can be added by right clicking and selecting Add. A new window will pop up where the rule may be specified.


Once the replacement rule is applied, in the figure below you can see how the SQL Select ‘hello 🙂’ statement is received as an answer to “11 Paths” string. With these changes, firewall applications could be implemented, filtering some parameters that received over the network by the applications could represent a risk.


An important feature is that HookMe supports plugins developed in Python. These plugins may be created with different goals, like saving communications in a file, modifying traffic,  certificates, application firewalls, etc. The following screenshot shows the interface where plugins are loaded, and a simple Python interface inside the application itself.


One of the available plugins is MySQL_Backdoor.txt which forces HookMe to attach itself to mysqld.exe process and listens to a specially crafted packet. In this case it looks for the “|exec command|” string. This string may be sent as a username during authentication process, for instance. A video recording explaining this plugin is available here:


The tool may be freely downloaded. License and more details are available from its official web https://code.google.com/p/hookme/
Manuen Fernández

So is it true that malware for Firefox OS has been found?

Florence Broderick    24 October, 2013

The power of a good headline is hypnotic. The one taking a lot of security news during these days is the “Found first malware for Firefox OS”. The title is attractive, but, is it right? Reading the news invites to think about what has really happened, what is this “discovering” about, and why we haven’t overcame still so many myths.

Firefox OS is a recent operative system based on web. All its programs are web based, created using JavaScript, CSS3 and HTML5. This implies that applications may be distributed in two ways: in a zip that contains it all, or via an URL that hosts it and is later visited.


A 17 years old by has developed a malware proof of concept for Firefox OS. He will be presenting its research in a convention in November. He states that his application allows to perform some potentially unwanted remote tasks over the device, and that is able to control it sending remote commands.

First of all, security model


According to Firefox OS security modeluses a defense-in-depth security strategy to protect the mobile phone from intrusive or malicious applications. This strategy employs a variety of mechanisms, including implicit permission levels based on an app trust model, sandboxed execution at run time, API-only access to the underlying mobile phone hardware, a robust permissions model, and secure installation and update processes“. So far (except the way hardware is accessed), nothing that any other operative system doesn’t implement (and nothing that really may stop “infections”).

https://developer.mozilla.org/en-US/docs/Mozilla/Firefox_OS/Security/Security_model

Something that, in some way, may make a difference in Firefox OS, is how it classifies permissions in apps. There will be three different kinds:

  • Certified: the ones installed by the vendor and critical functionality (telephone, SMS, bluetooth, clock, camera…). They will be able to access any API. For example, only certified apps (the ones coming with the device) will be able to make phone calls.
  • Privileged: The ones reviewed, approved and digitally signed by an authorized marketplace. They will have access to a subset of APIs accessible to certified ones.
  • Untrusted: The other ones that will not be in a market. These will have only access to a subset of APIs that may not make any harm.

Let’s see now what can be deduced from the announce of the program created by Shantanu Gawde.


Differenciate between the “what” and the “how”

A teenager has created an application that makes unwanted actions on the system. He talks literally about “infecting” and “control like a botnet”. About sending commands to access SD card, about “spooking the user remotely controlling FM radio”, “upload and download multimedia files”. It seems to be able to control certain device apps, but we do not know how far it may go.


Official description in http://g0s.org/key-focus-areas/

Is this malware? It depends. There will be legit applications that will need to access SD card data, contacts, etc. It will be allowed because the user will trust the vendor or developer. As the Firefox OS security description document states, the model is based on application trust.

What may attract some attention is the state about controlling other apps (he specifically talks about controlling FM radio). Talking about “sending commands” invites to call it “malware”, too, though, once the application is installed, it seems quite easy to send commands… so in general, the problem is not so much “what” does this proof of concept do, but “how”, how does it get the necessary permissions and how it got to get them. With the information we have, we guess the user launches an application hosted in a server and accomplish some tasks that may be potentially unwanted by the user.

More questions than answers

To get to the real scope of the statement, we should answer these questions.

  • Is this program able to bypass some security restriction in Firefox OS? This would include elevation of privileges, accessing without permissions to privileged API, bypass security dialogs, warnings that could alert the user… any way that implies bypassing, breaking or evading Firefox OS security model. It seems to do that, but it’s not clear.
  • Does the malware replicate itself in some way, for example leveraging some vulnerability or design flaw? Does not seem so. If Gawde had found a way to spread a program without human interaction, that would have been breaking and disturbing news. But, with the information we have, it does not seem to be the case.
  • Does the malware hide itself in some way, for example in legit apps? It does not seem so, either. It would have been interesting if a way of launching hidden or embedded apps had been disclosed, just as the first “virus” did. What may be a problem with Firefox OS is, that confusing or obfuscated URLs hiding apps would execute just with a click… and that has been alerted since long ago.
  • Are special circumstances needed for the proof of concept to work? Are just some devices vulnerable?, Does it work with default configuration? Or is is necessary to keep some service, or app working…?
  • Does it use any technique to hide its execution from the user? Something that attracts attention is that the developer itself says “there is no way to detect the attacks or even stop them”. In security, such convincing assertions are usually misguided. We suppose he refers to a model where an URL is visited and it results in an app executing that starts, without user interaction, some information exchange between the “victim” and the attacker, that may control the device.

Without these answers (between others), information may be based just on speculation. And the developer should have answered them beforehand in his statement, just like others do, so we can understand (without the need of technical details) how he got it and not describing so much what he got. It should be highlighted that he states that the purpose of the PoC is of course to motivate developers to ensure better security on their platforms rather than providing inspiration to those with malicious intents.

Anyhow, the “malware” or any other in the future will not be exactly a surprise. When execution of uncontrolled applications and alternative “markets” are allowed, abuse is practically guaranteed. Although it’s through restricted applications, many of them will not need special permissions to infect with “adware” and show ads, and some other may just find some ways to bypass permissions leveraging vulnerabilities or design flaws.

A Firefox OS spokesman states that possible, Gawde relied on 
developer mode functionality, which is common to most Smartphones but disabled by default. In addition, we believe this demonstration requires the phone to be physically connected to a computer controlled by the attacker, and unlocked by the user. In other words, they think he has “cheated”. Of course, they try to downplay the issue because of the lack of information.

So, without any more actual data, the headline should be that a researcher has possibly found a design flaw or a way to bypass some security in Firefox OS, executing privileged remote actions on the device. But we can’t be sure yet. What is for sure is that, talking about “malware” confuses the user, that may feel menaced without an actual reason to… yet.


Sergio de los Santos

How to use Metashield protector for Client and why using it

Florence Broderick    21 October, 2013
Metashield is an Eleven Paths product that allows to clean up metadata from most of office documents. It tries to cover a gap where there seems not to exist any unified solutions to remove all metadata from documents.
Why is it so important to remove metadata?
In 2003 Tony Blair presented a report in the british upper house, received from US intelligence service. It was supposed to be an undeniable proof of the existence of weapons of mass destruction in Irak. The prime minister denied that the document had been manipulated or modified in any way by the British government. Nevertheless the document was released in the government’s webpage and metadata revealed a list of certain users that proved that it had been manipulated by British government staff.

On December 2010, a document released as a press notice from AnonOps (Anonymous Operations) showed a name in its metadata. It was the graphical designer Alex Tapanaris, that was put under arrest because of his relation with Anonymous.

A “defacer” that hacked some official United States webpages, published some photos of his girlfriends neckline, mocking with impunity. He forgot to clean up the metadata and his GPS coordinates where found inside the photo. The FBI arrested him.
In December 2013, John McAfee was on the run from the Belize police when declared as a “person of interest” after one of his neighbors was found shot to death. Some journalist showed a photo boasting of being with him. Metadata revealed his exact location. 
How to clean up metadata?

Metashield Protector For client  is a tool to remove metadata in a fast an effective way. It creates a copy of the document, so the original document remains untouched. Eleven Paths has developed this tool for Windows environments, and is able to remove metadata from Office, Open Office, StarOffice, Pdf, Jpg and even iWorks Apple documents. It is enough to spot one or several documents in the computer (or inside of a shared network directory) and remove the metadata with a mouse-click.
This tool allows to select two kinds of “cleaning”:
  • Clean keep original files: It generates an exact copy of the document, with no metadata keeping the original one untouched. 
  • Clean Metadata: It removes the metadata from the original file.

The speed of the process depends on the number of selected documents and their size.

The examples mentioned before, show how unknown metadata is, and how metadata can be reached in digital documents by anyone in the net. On the other hand, a metadata-free document implies professionalism, responsibility and dedication from its owner, not disclosing any kind of sensitive information aside from the strictly necessary.

How to take advantage of Chrome autofill feature to get sensitive information

Florence Broderick    15 October, 2013

At the end of 2010, Google introduced autofill in Chrome, a comfortable feature, that may be a security problem for its users. Even after some other browsers suffered security problems related to this feature, and the feature itself were questioned, it is still possible to steal information stored from the user filling up a form, without him to notice.

As a rule of thumb, storing sensitive data in the browser is not a good idea. Just before Chrome implemented autofill, during 2010 summer, it was discovered how to disclose data stored in Safari, by bruteforcing with JavaScript. The user filled up an input field but the browser was able to rescue all other stored data pieces, just by trying letters and letting the browser do the rest. The vulnerability was patched short after. Not long ago, in 2013 summer, it was hardly discussed how easily you could recover passwords stored in Chrome, which could be viewed in clear text.

With an easy method, a user may give unconsciously his data to a third party, just by filling up an innocent form.

How does it work?

Chrome’s autofill allows to store postal addresses (divided in some other data like name, surname, telephone, postal code…) and credit card (divided in cardholder name, number and expiration date). Every data piece (except credit card) can be synchronized with a Google account. The configuration menu and how to get to it, may be observed in the following image sequence.

Different autofill configuration screenshot in Chrome

For a form to take advantage of autofill feature, input fields has to be properly identified so Chrome knows what values go with them.

It relies on some heuristics for the fields to match. For example, it knows that autocomplete=”mail” should be autofilled with the same content that autocomplete=“Work email”.

The “attack”

An attacker may take advantage of this characteristic to obtain private information like an address or credit card data. We set out a scenario where the victim visits a specially crafted https web page, fills up some data, and the attacker uses browser’s autofill to get stored sensitive data. And this, despite the easy-to-bypass obstacles that Chrome introduces in its code to avoid this situation.

For example, as a precaution, Chrome only fills up credit card number with autofill under https pages. This is not a problem for the attacker, since he just have to operate from a SSL connection. There are fraudulent webpages that work with certificates issued for free.

The second step is to set up a form and hide the inputs the attacker is interested in from the user. First idea is to use a “hidden” tag. But it’s forbidden in Chrome. A second idea would be to introduce the form inside a div tag with visibility set to “hidden”… but Chrome avoids to autofill inputs under this conditions. How to get it then?

A formula would be to take advantage of the scroll property, rising up the layer some pixels so the inputs used to steal information are unseen. In this case, the “decoy” form would be:

By using this specially crafted “div”, we get to hide inside it all these inputs and the browser will not show them (but will autofill them):

div style =”overflow:hidden;height:25px;”


Chrome will fill up all that information without the user noticing anything. The attacker, may pick up the information and get much more information than the user thought he had given.

In summary, although it is comfortable to use (for systems used by a single person), autofill should be avoided since it is proven to be a risk. A victim could offer to any https webpage sensitive data such as credit card number and expiration date, without the victim noticing.

To avoid this problem (or any other potential one in the future), the best remedy by now is to simply not use this functionality.

Ricardo Martín Rodríguez

How to cause a DoS in Windows 8 explorer.exe

ElevenPaths    30 September, 2013

We have discovered by accident how to cause a Denial of Service (DoS) in Windows 8. It’s a little bug that is present in the last version of the operating system. Since we alerted Microsoft first and they didn’t consider it a real security problem that could be attacked we’re documenting it as an anecdote.
Explorer.exe is a very important service in Windows. It’s in charge of painting the desktop and gives the security tokens to the programs that are in the same environment. It’s of vital importance that it’s running in every moment, hence if the process dies for some reason, the operating system itself will recover it automatically.
Seemingly, in Windows 8, explorer.exe doesn’t handle correctly an exception that is thrown when dealing with digital certificates and it forces it to close and launch again. This problem also affects other programs that use the same internal API that processes ASN.1 structures. For example, any program that uses .NET and processes the “signedInfo” field of a signature.

/* Style Definitions */ table.MsoNormalTable {mso-style-name:”Tabla normal”; mso-tstyle-rowband-size:0; mso-tstyle-colband-size:0; mso-style-noshow:yes; mso-style-priority:99; mso-style-qformat:yes; mso-style-parent:””; mso-padding-alt:0cm 5.4pt 0cm 5.4pt; mso-para-margin-top:0cm; mso-para-margin-right:0cm; mso-para-margin-bottom:8.0pt; mso-para-margin-left:0cm; line-height:107%; mso-pagination:widow-orphan; font-size:11.0pt; font-family:”Calibri”,”sans-serif”; mso-ascii-font-family:Calibri; mso-ascii-theme-font:minor-latin; mso-fareast-font-family:”Times New Roman”; mso-fareast-theme-font:minor-fareast; mso-hansi-font-family:Calibri; mso-hansi-theme-font:minor-latin;}

These are steps to reproduce the problem:
  • Have a signed binary (DLL or EXE) at hand. Any binary is valid if it’s signed.
  • Fill the last section of the PKCS structure with zeroes or random values. For example 256 bytes of “00”.

/* Style Definitions */ table.MsoNormalTable {mso-style-name:”Tabla normal”; mso-tstyle-rowband-size:0; mso-tstyle-colband-size:0; mso-style-noshow:yes; mso-style-priority:99; mso-style-qformat:yes; mso-style-parent:””; mso-padding-alt:0cm 5.4pt 0cm 5.4pt; mso-para-margin-top:0cm; mso-para-margin-right:0cm; mso-para-margin-bottom:8.0pt; mso-para-margin-left:0cm; line-height:107%; mso-pagination:widow-orphan; font-size:11.0pt; font-family:”Calibri”,”sans-serif”; mso-ascii-font-family:Calibri; mso-ascii-theme-font:minor-latin; mso-hansi-font-family:Calibri; mso-hansi-theme-font:minor-latin; mso-ansi-language:EN-US; mso-fareast-language:EN-US;}

A part of the signature filled with 00s

/* Style Definitions */ table.MsoNormalTable {mso-style-name:”Tabla normal”; mso-tstyle-rowband-size:0; mso-tstyle-colband-size:0; mso-style-noshow:yes; mso-style-priority:99; mso-style-qformat:yes; mso-style-parent:””; mso-padding-alt:0cm 5.4pt 0cm 5.4pt; mso-para-margin-top:0cm; mso-para-margin-right:0cm; mso-para-margin-bottom:8.0pt; mso-para-margin-left:0cm; line-height:107%; mso-pagination:widow-orphan; font-size:11.0pt; font-family:”Calibri”,”sans-serif”; mso-ascii-font-family:Calibri; mso-ascii-theme-font:minor-latin; mso-hansi-font-family:Calibri; mso-hansi-theme-font:minor-latin; mso-ansi-language:EN-US; mso-fareast-language:EN-US;}

In this example we’ve overwritten part of the information regarding the countersignature as we can observe when opening the ASN.1 structure with a different program. We haven’t tested exactly which part causes the problem when being overwritten.
On the left, altered ASN.1 structure, on the right, unaltered structure.

/* Style Definitions */ table.MsoNormalTable {mso-style-name:”Tabla normal”; mso-tstyle-rowband-size:0; mso-tstyle-colband-size:0; mso-style-noshow:yes; mso-style-priority:99; mso-style-qformat:yes; mso-style-parent:””; mso-padding-alt:0cm 5.4pt 0cm 5.4pt; mso-para-margin-top:0cm; mso-para-margin-right:0cm; mso-para-margin-bottom:8.0pt; mso-para-margin-left:0cm; line-height:107%; mso-pagination:widow-orphan; font-size:11.0pt; font-family:”Calibri”,”sans-serif”; mso-ascii-font-family:Calibri; mso-ascii-theme-font:minor-latin; mso-hansi-font-family:Calibri; mso-hansi-theme-font:minor-latin; mso-ansi-language:EN-US; mso-fareast-language:EN-US;}

If we overwrite other kind of information Windows will simply think that the binary isn’t signed and won’t show the “Digital signatures” tab in the properties dialog.

  • Using Explorer to access the “Digital signatures” tab will crash explorer.exe with an unhandled exception. Other programs like “Total commander” also crash in the attempt of showing the certificate. This bug is only present in Windows 8. The same proof of concept in Windows XP/7 only tricks the system to show the “Digital signatures” tab without any info to display. This isn’t normal either (the tab shouldn’t be visible) but at least it doesn’t kill the process.

Other programs that check the signature such as sigcheck or signtool are not affected.
In theory this can be related to the change of design. In Windows 7 and XP the email of the signer is shown in the “Digital signatures” information tab. In Windows 8 the hash is being shown. We suppose that they became aware that very few signers include the email in the signature, and this field was usually blank.
On the left, properties of a signed file in Windows 7. On the right, in Windows 8.


/* Style Definitions */ table.MsoNormalTable {mso-style-name:”Tabla normal”; mso-tstyle-rowband-size:0; mso-tstyle-colband-size:0; mso-style-noshow:yes; mso-style-priority:99; mso-style-qformat:yes; mso-style-parent:””; mso-padding-alt:0cm 5.4pt 0cm 5.4pt; mso-para-margin-top:0cm; mso-para-margin-right:0cm; mso-para-margin-bottom:8.0pt; mso-para-margin-left:0cm; line-height:107%; mso-pagination:widow-orphan; font-size:11.0pt; font-family:”Calibri”,”sans-serif”; mso-ascii-font-family:Calibri; mso-ascii-theme-font:minor-latin; mso-hansi-font-family:Calibri; mso-hansi-theme-font:minor-latin; mso-ansi-language:EN-US; mso-fareast-language:EN-US;}

A quick analysis results in our hypothesis that it’s difficult to take advantage of the bug to run arbitrary code. MSRT confirms us that it is more like a bug and not a real security problem.
Sergio de los Santos

How does blacklisting work in Java and how to take advantage of it (using whitelisting)

Florence Broderick    23 September, 2013
Oracle has introduced the notion of whitelisting in its latest version of Java 7 update 40. That is a great step ahead (taken too late) in security for this platform but… how does it work? how does it deal with older versions? And what is most important… how to block everything but the applets you want?

This is the first time in years that Java allows to whitelist applets. This has become a true necessity for security, because of quite aggressive kits exploiting everything related with Java and its self “natural born insecurity”. Before this version Java was the one blacklisting some applets, but it was managed by Oracle only, updated in each new version, not dynamic and very badly documented. But now, at last with Java 7u40 we have the chance to whitelist applets. It is not trivial though. But it is not trivial though.

What you will need is a ruleset.xml file, compile it and sign it. For signing it you may use a real certificate or a selfsigned certificate created by yourself but installed in your trust-store.

Step by step. Creating the ruleset.xml

This is a standard XML file with a simple syntax. It defines which applets to block or allow depending on the domain they come from or who signed them. It also defines which version of Java has to be used to run the applet. Wildcards and rules by default are accepted, doing it may be quite granular. Let’s create a file that allows only applets working with the ones hosted in java.com, and deny other applets.

<ruleset version=”1.0+”>
<rule>
  <id location=”http://*.java.com” />
  <action permission=”run” version=”SECURE-1.7″ />
</rule>
<rule>
<id />
  <action permission=”block”>
  <message>Bloqueado por las reglas del sistema</message>
</action>
</rule>
</ruleset>

Last “id” means this is the “by default” rule and matches everything not matched before. The “version” tag may be handy… or tricky. It allows you to specify that an applet will run only with a desired (older) version that will, by definition, have security problems. So if the computer is keeping older versions (6.x) and an applet uses it… be aware this rule doesn’t work for branch 6 (nothing will be blocked). So, if keeping this branch in the computer, this may all be useless.
Ruleset allows to execute, for example, only applets signed by a certificate and much more. Specifications are here.)

Step by step. Creating the jar and signing it

Download JDK and execute:

C:Archivos de programaJavajdk1.7.0_40bin>jar -cvf DeploymentRuleSet.jar rulset.xml

Then, sign it:

C:Archivos de programaJavajdk1.7.0_40bin>jarsigner -verbose -keystore keystore.jks -signedjar DeploymentRuleSet.jar DeploymentRuleSet.jar selfsigned

Where “keystore.jks” may be your actual key store and “selfsigned” the alias of your certificate. If you already have a valid certificate (signed by a CA), skip the following part. If not, create a self signed one with the command:

keytool -genkey -keyalg RSA -alias selfsigned -keystore keystore.jks -storepass 123456 -validity 360 -keysize 2048

Where “123456” is the password to unlock the keystore (do not confuse it with the password of the certificate itself).

It will ask some questions. It does not matter how you answer them.

Finally, export the certificate:

keytool -export -alias selfsigned selfsigned.crt -keystore keystore.jks

And import it as a trusted root. You may do it in Windows (installing it as a trusted root in certmgr.msc) or inside Java certificate store. This is the way to do it:

C:Archivos de programaJavajdk1.7.0_40bin>keytool -importcert -alias selfsign
ed -file self.crt -trustcacerts -keystore ….jre7libsecuritycacerts
Now  DeplymentRuleSet.jar is signed, copy it to its place (funny how Oracle still keeps some “Sun” names, four years later).

C:Archivos de programaJavajdk1.7.0_40bin>copy DeploymentRuleSet.jar c:WINDOWSSunJavaDeploymentDeploymentRuleSet.jar

Execute javacpl.cpl and check Java is aware of the rules.


Checking it all

So, if you check applets hosted inside the specified domain, they will run but any other will be blocked. This is a great and very expected security measure if you do not have to deal with older versions.


Do not forget:
  • This is useless if other Java security measurements are not deployed. For example rise up the security leverage to “high” in security options. So far, with this leverage we could be “protected” against self-signed java malware, but what about properly signed ones? This feature tries to cover that gap.
  • Very important: whitelisting an applet by any kind of rule makes other warning screens introduced in java 7u10 go away, like this one (it will not show up if whitelisted):
  • This is useless if Java is not updated and older versions deleted in the system.
Just to check, using a not trusted certificate for DeploymentRuleSet.jar will block applets with a different message.


It’s important to notice that Oracle has warned that they will blacklist certificates that sign DeploymentRuleSet.jar files that allow to execute everything.

Anyhow, Oracle had to keep backwards compatibility with 1.6 branch, and when they drop support for it, this is the best way they have found to help administrators with some native tool to control Java plugin madness. Not bad.

Sergio de los Santos
@ssantosv

Showing certificate chain without validating with Windows "certificate store" (C#)

Florence Broderick    19 September, 2013

Java has its own independent certificate store. If you wish to view natively in Windows a certificate extracted from an APK or JAR file Windows may not find the root certificate and thus won’t be able to “verify trust” and validate it. We would have to use Java’s dialog to view the certificate correctly.


What if we visualize the same certificate in Windows? In this second screen capture we can see the given error when the Intermediate CA and Root CA are not found in our local Windows certificate store (“Thawte Code Signing CA” in our example). This dialog is shown by default when executing files with .DER extension or by calling X509Certificate2UI.DisplayCertificate() in code which inherits System.Security.Cryptography.X509Certificates.
  

To display the certificate and validate the chain correctly we have different possibilities: 
  • Installing all Java’s “Root CA” certificates: Inefficient, It requires user confirmation for every certificate.
  • Install temporarily the root certificate referenced by the APK/JAR file and delete it after the validation process. This option also needs user confirmation and it’s usually not a good idea to modify the user’s trusted certificate list.
  • Extract the entire certification chain of the file and doing the validation manually. Obviously the best option.

The first option to think of is using Microsoft’s own X509Chain to validate the certificate chain. The behavior of X509Chain is highly configurable and allows us to change the various chain verification policies and adding chain elements manually. Once we have defined “ChainPolicy” and “ChainElements” we use the X509Chain.Build() method that returns us a Boolean value either validating or not the certificate chain. And that’s it, we have a Boolean value but no graphic information.
Furthermore, if we don’t have the root certificate installed in our certificate store, we’re unable to import the intermediate certificate as a X509ChainElement which is necessary to build the chain correctly.

However, even if Windows doesn’t trust these certificates, they’re still present in PKCS#7 structure that we have extracted from the APK/JAR file. We need to dig deeper and call lower level functions.
The ideal scenario is to create our own certificate store in memory and leave the CurrentUser and LocalMachine stores unmodified. The store is then passed to CryptUIDlgViewCertificate which is imported from “Cryptui.dll” and is the same dialog that is associated in Windows to file with extensions such as .cer .crt… This way, Windows validates the chain against the store that we have created and the chain is displayed correctly even though the root certificate is not trusted by Windows natively.
The way to create our “virtual store” in memory is using “CertOpenStore“. To use it in C# we need to import the DLL:

[DllImport("CRYPT32", EntryPoint
= "CertOpenStore", CharSet = CharSet.Unicode, SetLastError = true)]
public static extern IntPtr CertOpenStore(
int storeProvider, int encodingType,
int hcryptProv, int flags, string pvPara);

When calling the function we need to indicate that our storeProvider is of type CERT_STORE_PROV_PKCS7 and “pvPara” will point to the data.

Apk and Jar files store the PKCS#7 structure in a RSA or DSA format. Therefore, we need to extract the PKCS#7 structure first to work with the data contained inside.
We can do this using WinCrypt and more specifically CryptQueryObject in the following way:
  
if (!WinCrypt.CryptQueryObject(
WinCrypt.CERT_QUERY_OBJECT_FILE,
Marshal.StringToHGlobalUni(@"X:RutaFichero.RSA"),
WinCrypt.CERT_QUERY_CONTENT_FLAG_ALL,
WinCrypt.CERT_QUERY_FORMAT_FLAG_ALL,
0,
out encodingType,
out contentType,
out formatType,
ref certStore, //Contiene el "Store" con los certificados.
ref cryptMsg, //Contiene la estructura PKCS7
ref context))

cryptMsg contains the PKCS#7 structure that we can work with but WinCrypt kindly offers us certStore of type IntPtr that already contains the certificates, CRL (certificate revocation list) and CTL (certificate trust list) which saves us time. We can then pass certStore as an extra store to CryptUIDlgViewCertificate which will validate the main certificate against the extra store and show the result in its own window. Here is the code:

//en myCert tendremos el certificado principal
X509Certificate2 myCert = new X509Certificate2(@"X:RutaFichero.RSA");

//los extra stores que queramos usar deben pasarse como puntero al array que los contiene
var extraStoreArray = new[] { certStore };
var extraStoreArrayHandle = GCHandle.Alloc(extraStoreArray, GCHandleType.Pinned);
var extraStorePointer = extraStoreArrayHandle.AddrOfPinnedObject();

//rellenamos la estructura con los parámetros
CRYPTUI_VIEWCERTIFICATE_STRUCT certViewInfo = new CRYPTUI_VIEWCERTIFICATE_STRUCT();
certViewInfo.dwSize = Marshal.SizeOf(certViewInfo);
certViewInfo.pCertContext = myCert.Handle;
certViewInfo.szTitle = "Certificate Info";
certViewInfo.dwFlags = CRYPTUI_DISABLE_ADDTOSTORE;
certViewInfo.nStartPage = 0;
certViewInfo.cStores = 1;
certViewInfo.rghStores = extraStorePointer;
bool fPropertiesChanged = false;

if (!CryptUIDlgViewCertificate(ref certViewInfo, ref fPropertiesChanged))
{
int error = Marshal.GetLastWin32Error();
MessageBox.Show(error.ToString());
}
Finally we obtain the desired result and a valid certificate chain.

Tero de la Rosa

Quick and dirty shellcode to binary python script

Florence Broderick    12 September, 2013

https://google-code-prettify.googlecode.com/svn/loader/run_prettify.js

If you work with exploits and shellcode, you already know what shellcode is and how to deal with it. Sometimes it comes with exploits in C, Perl, Python… It usually looks like:
payload = (b"xbfxabxd0x9ax5bxdaxc7xd9x74x24xf4x5ax2bxc9" +
"xb1x45x83xc2x04x31x7ax11x03x7ax11xe2x5ex2c" +
"x72xd2xa0xcdx83x85x29x28xb2x97x4dx38xe7x27" + ...
But sometimes you need a binary file representation of this shellcode, so you can inject it into some file, debug it or for whatever reason. There are all kinds of scripts out there to deal with shellcode and accomplish different tasks. Binary to shellcode, shellcode to binary (only for bash)… But I was not able to find a simple script to get it under Windows. Even finding “xxd” command (make a hexdump) ported to Windows is possible but not easy (it seems to come bundled with Vim for Windows, but it used to be available with unixtools…).

Anyhow, here is a simple script in Python that works for Windows and will do the job. It will tolerate dirty shellcode (spaces, returns, concatenation commands…) and will only keep hex characters. Then it uses “write” with “wb” so you get a binary file. Quick and dirty.

Here’s the tiny code. Just copy it and save it as a .py file. Tested with 2.7 branch.

import binascii
import fileinput
import os
import re
import sys

def shell2bin(args):
if len(args) < 2:
print "Usage: %s shellcodefile binfile" % args[0]
return
else:
try:
with open(sys.argv[1], "r") as fileshell:
flux = fileshell.read()
flux = re.sub("[^0-9,^a-f,^A-F]", "",flux)
with open(sys.argv[2], "wb") as filebin:
filebin.write(binascii.unhexlify(flux))
print "Done!"
except IOError as e:
print "I/O error({0}): {1}".format(e.errno, e.strerror)
except:
print "Unexpected error:", sys.exc_info()[0]
if __name__=='__main__':
shell2bin(sys.argv)

Sergio de los Santos 

White Paper: Practical hacking in IPv6 networks with Evil FOCA

Florence Broderick    30 August, 2013

We have released a white paper about practical hacking in IPv6 networks with Evil FOCA. This document describes IPv6 basic concepts, most common IPv6 current attacks and how to implement them with Evil FOCA. It’s based on previous works released in Spanish by elladodelmal.com

Contents are: 
  • IPv6 concepts
  • Neighbor Spoofing
  • SLAAC attack with Evil Foca
  • Bridging HTTP (IPv6) – HTTPs (IPv4)

It’s uploaded in slideshare, and you can download it. Hope you enjoy it.

Information leakage in Data Loss Prevention leader companies

Florence Broderick    16 August, 2013
Gartner has released a study that classifies the most important companies that offer Data Loss Prevention (DLP) solutions depending on their position, strategy, effectiveness, and market leadership. We have made a little experiment to test if these same companies control metadata leaks in their own services, as a potential sensible data leak point.

According to the “Magic Quadrant for Content-Aware Data LossPrevention” research made by Gartner in 2014 over 50% of companies will use some kind of DLP-solution to keep their private data safe but only 30% will use a content based solution. 
This same research lists which are the leading companies in terms of data loss prevention establishing a scale based on factors such as Content-Aware proportioned DLP, DLP-Lite products and if a DLP channel is available for the user to clarify doubts about regulatory compliances, for example.

This study made by Gartner determines which are the leader companies when preventing leaking information, establishing as measurement factors to generate leadership indicators as: provided content-aware DLP solutions, DLP-Lite products offered or if they provide a DLP channel to the user so he can clarify doubts about compliments, for instance.

Data Loss Prevention leading companies, by Gartner
Do these companies avoid information loss through metadata in their systems? We conducted an analysis of the main web pages of these aforementioned companies that were included in Gartner’s study using MetaShieldForensics. Metashield automatically downloaded and analyzed every document exposed on the corporative webs of the companies.
The following table displays the results. Every single company leaks metadata associated to their public documents that are being exposed on the Internet. Seemingly these documents are not being cleaned and are thereforea potential private information leaking point that is to be taken into account.
Information leakage exposed by companies that provide DLP tools and services
Based on this information we proceded to graph the data showing the amount of information being leaked by the studied DLP companies. Logically the companies that most suffer of information leaks also have more publicly available documents in their web pages.
Information leakage exposed by companies that provide DLP tools and services
Names or account names followed by internal directories where the documents were created are the most commonly leaked pieces of information. Another usual leak is the the software version being used when generating the document. This group of information is valuable for a potential attack.
Let’s see some details about the leaked information:
  • Users and user accounts: The internal usernames and their mail accounts are very noteworthy. This information can help the attacker to forge a more complex and sophisticated attack.
  • Paths to internal web services: Some of these provide valuable information about the internal network. For example, one of the documents contained an URL that points to an OpenNMS portal (http://159.36.2.25:8980/opennms/event/…/). OpenNMS is offered by Symantec as a solution for network administrators for controlling critical services in remote machines.
  • Internal user directories: The most common directories that are found contain user information in default paths such as “Desktop, My documents…”. For example, “C:Documents and Settingsholly_waggonerM20Documents****** Webpress2004” was detected in one of the DLP companies.
  • Network printers: This is also a very common leak. Network printers that expose information about their exact model and the server they’re associated with (either name or internal IP address).

  • Software used by the company:It is very common to leak the software being used by the company for generating a document. The most common piece of information refers to PDF documents which are very popular for publications.
  • Other metadata that exposes private information: A rather unusual but curious case is custom metadata generated in some documents which can result in a much more relevant leak than one can think at first sight. For example, properties like the subject of a specific email, an attachment or to whom it was sent can expose clues and evidence of internal business strategies like relations between companies or workers.

Conclusions
Metadata may still be widely unregarded when controlling information flow exposed on corporative webpages or simply sharing documents..
Information leak can happen at very different levels and in different ways. Document loss, non-controlled publication and non-intentioned document exposing is indeed a clear example of a problem to be avoided, however document metadata can’t be despised either, specially by a company that offers data loss prevention solutions.
Metadata and information leak shall not be regarded as a singular incident that only provides an attacker a document, an email or sensitive data. It’s also a process that a determined attacker will invest his time into. Depending on the implemented solutions and how protected the company is the attacker will gather all possible information taking advantage of every single leak (as inconsequential as they may seem) for getting to know his target and forging an attack.
The companies that offer solutions against information loss should take it into account in their own products. For example, erasing of metadata is a compulsory task for the Civil Service according to the “Esquema Nacional de Seguridad” (National Security Scheme) and LOPD. MetaShield Protector is a solution that some of them chosed.

Rubén Alonso Cebrián