Cryptographic Security in IoT (III)

Florence Broderick    4 November, 2016
The proliferation of IoT services platforms and devices is occurring much faster than the adoption of security measures in its field. In the face of the urgent need for mechanisms that guarantee the authentication, integrity and confidentiality, of both communications and the devices themselves, the trend is to transfer cryptographic solutions contrasted in traditional IT, such as public key digital certificates over SSL/TLS protocols. We are moving forward in the state-of-the-art of cryptography solutions for IoT.

HMAC Calculation

Execution of the HMAC command, as with other ATSHA204A commands, must precede execution of the Nonce command.

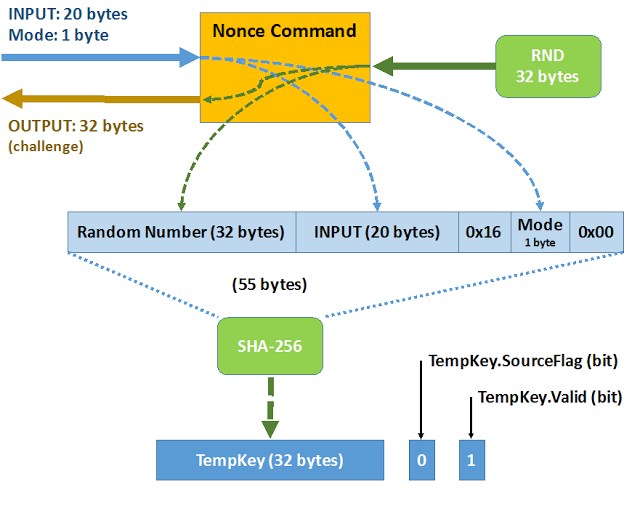
The aim of the Nonce command is to populate the 32-byte internal register, called TempKey, by generating or loading a challenge, which will then be used in later commands.

The Nonce command has three operating modes. 0x00 and 0x01 are the most common modes. In these modes, the Nonce command is invoked, providing it with a number of 20 bytes as an entry, to which it responds by returning a random number of 32 bytes that are generated internally as a challenge.

The 20 received bytes are linked to the random number of 32 bytes, along with three more bytes: 0x16, the mode and 0x00. And based on the set of 55 bytes, the SHA-256 summary, which is stored in the TempKey, is calculated. Additionally, two binary registers are modified:

  • TempKey.SourceFlag to 0, meaning random origin. 
  • TempKey.Valid, to 1, meaning that the TempKey is usable.
The difference between the 0x00 and 0x01 mode is that in the second case the seed of the random number generator does not update, something that Atmel does not recommend.

In 0x03 mode it is used to directly populate the TempKey, without generating a random number, or the SHA-256 calculation in bypass mode.

If the Nonce command has finished satisfactorily, setting the TempKey.Valid bit to value 1, it is then possible to invoke the HMAC command.

The call to the HMAC command is performed by providing as entry parameters only its mode of operation, and the slot number that contain the key to be used in the HMAC calculation. The response to this command will be the resulting number of 32 bytes from the HMAC-256 computation over a total of 88 bytes made up of:

  • Set of 0x00 value 32 bytes. 
  • Content of 32 bytes from the TempKey. 
  • Base of 24 bytes determined by the mode of operation. 

The HMAC command presents multiple modes of operation, which will determine the content of the OPT zone and the series number (SN) for the device incorporated into the base. It is possible that none of these elements are incorporated, establishing the last 20 bytes of the base at 0x00.

The base of the HMAC calculation will always begin by the 0x11 byte, followed by the mode byte, and two more bytes indicating the slot which is occupied by the key that will perform the HMAC-SHA-256 calculation.
The third least significant bit of the byte mode must coincide with the TempKey.SourceFlag value previously established by the Nonce command.

For all communication with the ATSHA204A device, both incoming and outgoing, two CRC cyclical redundancy check bytes will be added to guarantee the integrity of both the command invocation and its response.

Web PoC

Although the literal description of the authentication commands may appear confusing, their use becomes very simple once implemented within a code library, as can be seen below:

As a simple proof of concept (PoC), we have implemented the practical use case of an IoT device that must be robustly authenticated by a web service, using cryptographic hardware.
For the example to be extended towards the general public, Arduino is used as development environment on an ESP8266 platform that facilitates web access through its WIFI interface.
Any ESP8266 module could be used; a NodeMCU v0.9 has been used in this case, loading a sketch generated from the ESP8266 core for Arduino. An Atmel SHA204A Cryto-Authenticator externally connected to the NodeMCU module has been chosen as the cryptographic hardware.

From the different libraries available for managing the SHA204A, the best adapted for this in general, and the most worked on, was the work of Nusku in 2013. However, it apparently did not work uniformly on different devices and presented some important shortcomings. We have solved these problems by publishing our own fork in Github.
The authentication in the web service is done by inserting an authentication token in the HTTP request (GET request). This is a very common and widespread practice among the most important web authentication services. The “Authorization” header, together with the adequate parameters, has been added for this purpose.
These should include the “11PATHS-HMAC-256” type token, together with the corresponding encoded values in Base64 format. To simplify the process, in addition to the “id” of the device, the header also includes the “nonce” (challenge) and the “base“, used to calculate the verification “signature“, although the protocol supports the challenge provided by the server.
Captured requests could be re-utilized by sending all this data in the request. In order to avoid this weakness, the timestamp is added in unix-time format as part of the request to be signed.

GET /?timestamp=1458647701 HTTP/1.1rn

In order to sign the HTTP request with the Atmel SHA204A, it is summarized to 20 bytes with the SHA-1 algorithm. The Arduino core for ESP8266 includes this function in the “Hash.h” library, but it can be added from the Arduino Crytosuite if another platform is used.
The SHA204A Nonce command is invoked with the obtained 20 bytes, obtaining the 32 resulting bytes as the challenge, and they are stored.
The HMAC command is then invoked, indicating the slot number that contains the key with which the HMAC-SHA-256 will be calculated, together with the execution mode. Once these values (mode and slot) are known, the 24 byte base added to the calculation can be deduced. The result of this command will be the 32 bytes corresponding to the signature of the request.
These values, together with the “id” we assign to the device, will be the base64 parameters that will be included in the header. The base64 encoding is done using the Adam Rudd library.

Authorization: 11PATHS-HMAC-256
id=”EjEjEg==”,
nonce=”LmzzEpRnXvqmvnbOSobGp1VysR/wEpWoMNaY2Miew5g=”, base=”EQACAAAAAAAAAAAAAAAA7gAAAAABIwAA”, signature=”4qnOa5ZGecdzC+DscOSuOhJ64LeB1jTieJATUWPoIZE=”

The web service will be able to verify the authenticity of the IoT device that makes the request, performing the same calculations and comparing the results. To that end, it only needs to know the 32 byte key assigned to the device by its “id”.

The example web service has been published in the following url as part of the demonstration: http://sha204a.cf

This web service will respond with a JSON that contains information related to the authentication if it is valid, and failing this, with the details of the error that has occurred. It can be freely used for testing, because it answers to any id that has signed with the example key:

EB0C68BF96E8C26635D3450293D2FC501A63A09924FE90A7BD916AC521FDE0AA

A reciprocal authentication does not occur in this example; in other words, the web service’s answer does not contain any parameter aimed at verifying its own legitimacy, though incorporating it would have been easy. This condition is usually delegated by establishing a secure SSL (https) connection where the web service certificate is verified.

The code of the Arduino sketch is very simple. It manages the connection to the Internet with the “WiFiManager.h” library, which presents an AP with a captive portal from which to configure the Wifi network if the SSID has not been configured or is not available, or if its credential is not valid. Once the Internet connection is established, the current time is established through an NTP server.
An SHA204A authenticated request to the configured web service is made each time the FLASH button is pressed.

A simple Script in BASH can be used to test the connection to the web service; this simple script simulates the calculation of the signature the same way as the ATSHA204A would, and makes the web request.

The Shell Script, the Arduino code for the IoT module, and the PHP code of the web service are published in this Github space: https://github.com/latchdevel/crypto-iot

*Related Content:
Cryptographic Security in IoT (I)
Cryptographic Security in IoT (II)

Leave a Reply

Your email address will not be published. Required fields are marked *